Making and Restoring a Backup
The backup file
A backup is one file ending in .ppbkp, named by the day and the minute it was made:
Private Passwords Backup 2026-10-17 1433.ppbkp
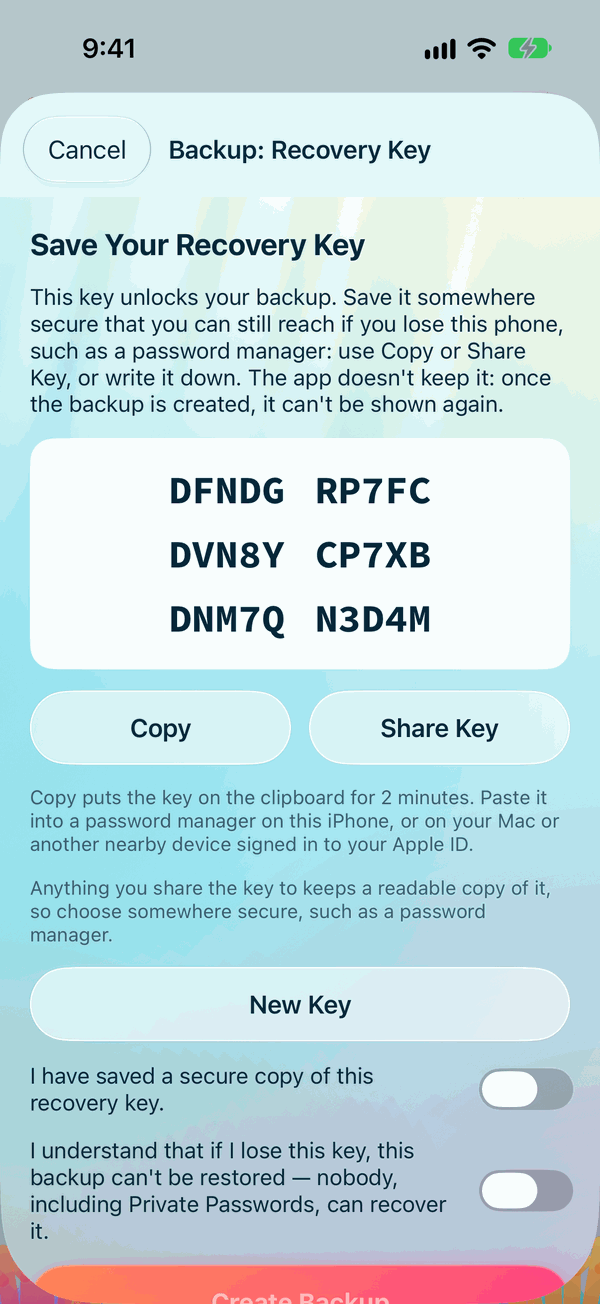
It holds everything listed under What a backup holds. The file is compressed and encrypted, and only its recovery key opens it: 30 letters and digits in six groups of five, which the app makes for you and shows you once, while you make the backup. You don't choose a password of your own. The recovery key is the password.
- The app doesn't keep the key. Nobody, including Private Passwords, can recover it.
- Every backup has its own key. The key of an earlier backup won't open a later one.
- The key uses only letters and digits that can't be mistaken for one another, and its last character is a check, so a mistyped key is caught at once.
- Without the key the file gives nothing away: not your items, not even which device made it.
For the technically minded
The file is sealed with AES-256-GCM. Its key is worked out from the recovery key with Argon2id (64 MiB of memory, the backup's own random id as the salt), then HKDF-SHA256. That stretching is what makes guessing the key so slow. Before sealing, the contents are compressed and padded to steps of 256 bytes, so the file's size gives only a rough idea of how much is inside.
Where backups go
A backup can go to two places, and you choose which in Settings, under Backup. Both are off to begin with: until one is on, Back Up says To back up, turn on Backup to file or Backup to iCloud in Settings, under Backup.
- Backup to file: a
.ppbkpfile, in a folder you choose. - Backup to iCloud: sent straight to your own iCloud, where only you can reach it. iCloud backups to keep says how many are kept, 3 to begin with: once a new one is safely saved, the oldest beyond that number is deleted. With 0, none are deleted.
Turn on both, and each backup goes to both places at once. Back Up shows each place that's on, with a tick: untick one to leave it out of this backup alone.
Backups in iCloud
A backup in iCloud is sealed just as a file is, but not with a recovery key you write down. It's locked with your iCloud Backup Key: one key, made by Private Passwords the first time you back up to iCloud, and kept in your iCloud Keychain, so it reaches your other devices on its own. You never see it unless you ask. So a backup to iCloud alone has no recovery key step: it's sent, checked and saved, and the last step says Saved to iCloud.
Where your items are kept on one device alone, Copy iCloud Backup Key on the Info page copies the key, for you to keep somewhere safe: a new device needs it to open those backups if your iCloud Keychain hasn't brought it.
If you back up to iCloud on a device that your iCloud Backup Key hasn't reached yet, Back Up waits for it: Waiting for Your iCloud Backup Key. It usually arrives within minutes. After an hour, Make New Key offers a new one, if you no longer have a device that holds the old. Backups already made with the old key still need it to open.
Backup files
Backups go to a folder you choose in Files: on this iPhone, in iCloud Drive or in any other place Files can reach. The first backup asks you to choose it, and this iPhone remembers it; Change folder… chooses another. After that, backups are saved there without asking. If a file of the same name is there already, the new one is numbered, for example Private Passwords Backup 2026-10-17 1433-1.ppbkp.
Backups go to the folder shown under Backup to file in Settings, under Backup: your home folder until you choose another with Change folder…. The first backup asks you to confirm the folder, so that your Mac lets the app write there. After that, backups are saved without asking. If a file of the same name is there already, the new one is numbered, for example Private Passwords Backup 2026-10-17 1433-1.ppbkp.
The last step of Back Up shows where the file was saved, with Show in Finder.
A file's recovery key opens that file alone. When a backup goes to a file and to iCloud at once, the key page says so: This key is for the file only. The iCloud copy opens with your iCloud Keychain.
Wherever the file goes, keep the recovery key somewhere else: in a password manager on another device, or on paper in a drawer. Not next to the file, and not only in Private Passwords itself, because you need the key at the very moment Private Passwords is what you have lost.
Making a backup
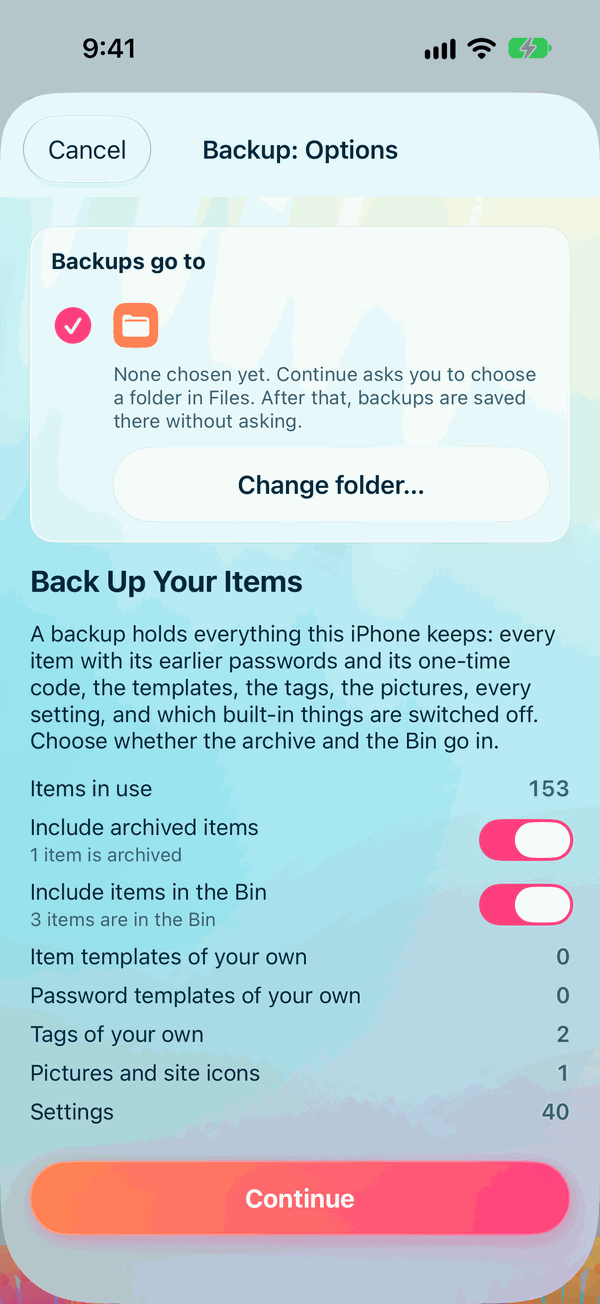
- Tap the logo to open the menu and choose Back Up, or tap Back Up on the Info page.
- Backup: Options shows where backups go first, under Backups go to: each place that's on in Settings, ticked, the folder with Change folder…. Until you have chosen a folder, it says so, and Continue asks you to choose one in Files. Below it is what the backup will hold, each with its count: your items in use, your own item templates, password templates and tags, your pictures and site icons, and your settings. Leave Include archived items and Include items in the Bin on, or turn either off. Tap Continue.
- Backup: Recovery Key, for a file. Save it now, before anything else: tap Copy and paste it into a password manager, tap Share Key, or write it down. A backup to iCloud alone skips this step.
- Turn on I have saved a secure copy of this recovery key. and I understand that if I lose this key, this backup can't be restored — nobody, including Private Passwords, can recover it. Tap Create Backup, and confirm with Face ID or Touch ID.
- Creating Backup reads every item, seals the backup, checks that it reads back exactly as written, and saves it: to your backup folder, to iCloud, or both.
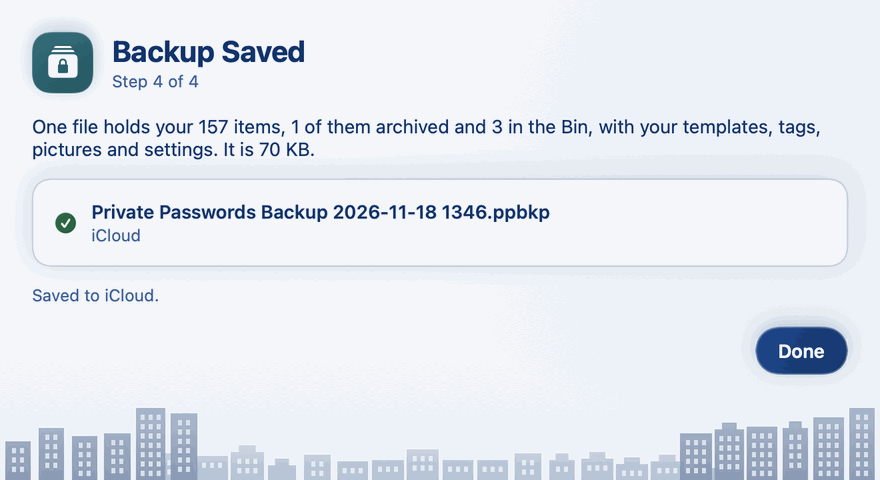
- Backup Saved says what the backup holds, the file's name and folder, and Saved to iCloud. where it went there. To keep a second copy of a file, copy it in Files.
- Tap Done.
While you make a backup, the key is hidden if the screen is being recorded or mirrored, and Share Key waits until that stops. If you take a screenshot of the key, the app reminds you to save the key somewhere else and delete the screenshot.
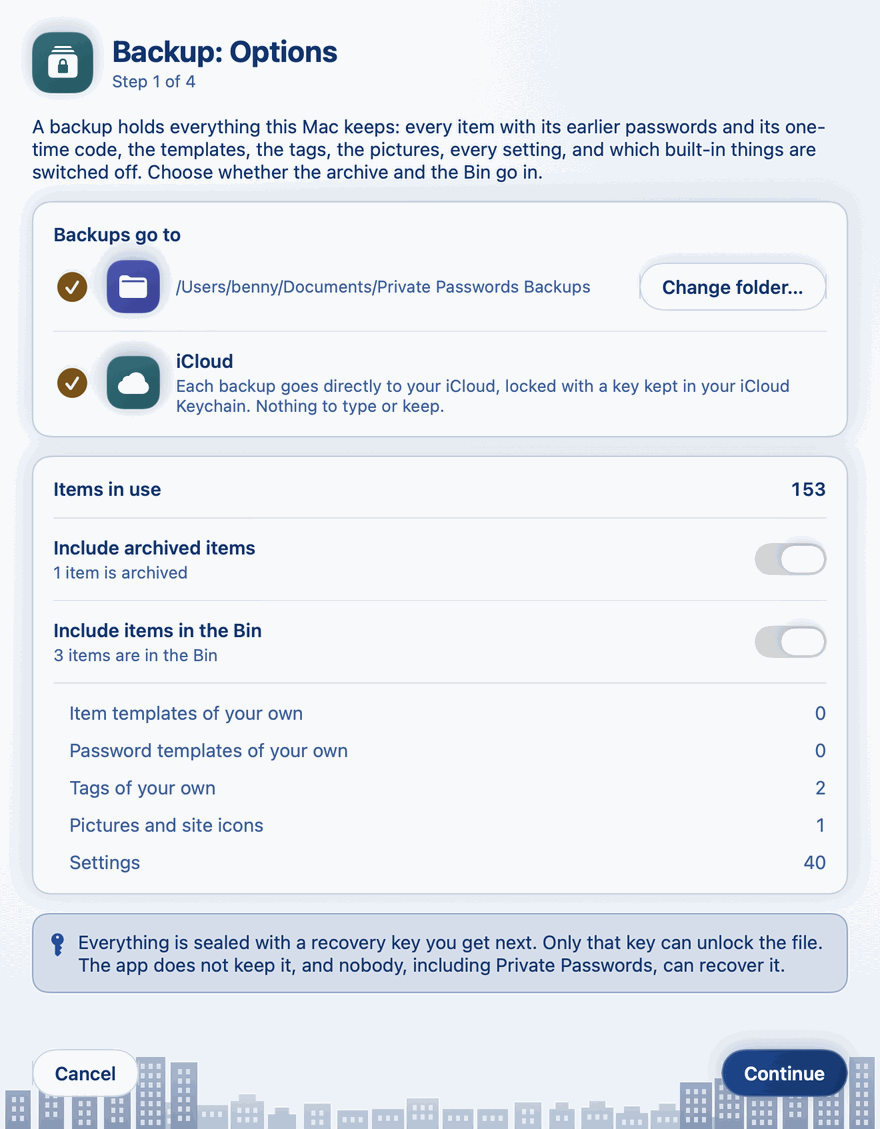
- Click the menu (☰) and choose Back Up…, or click Back Up… on the Info page. The Back Up window opens at Step 1 of 4.
- Backup: Options shows where backups go first, under Backups go to: each place that's on in Settings, ticked, the folder with Change folder…, your home folder until you choose another. The first backup to a file asks you to confirm the folder. Below it is what the backup will hold: your items in use, your own item templates, password templates and tags, your pictures and site icons, and your settings. Leave Include archived items and Include items in the Bin on, or turn either off. Click Continue.
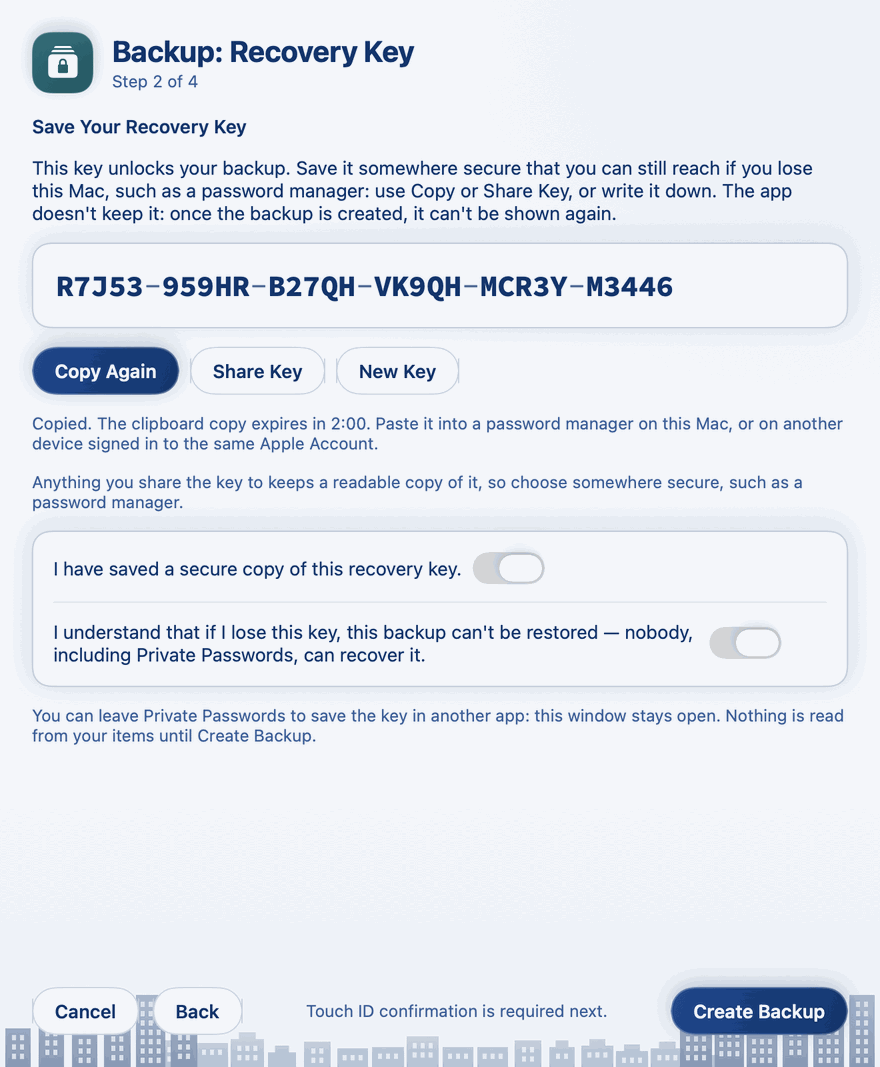
- Backup: Recovery Key, for a file. Save it now, before anything else: click Copy and paste it into a password manager, click Share Key, or write it down. A backup to iCloud alone skips this step.
- Turn on I have saved a secure copy of this recovery key. and I understand that if I lose this key, this backup can't be restored — nobody, including Private Passwords, can recover it. Click Create Backup, and confirm with Touch ID, or your Mac's password where Touch ID can't be used.
- Creating Backup reads every item, seals the backup, checks that it reads back exactly as written, and saves it: to your backup folder, to iCloud, or both.
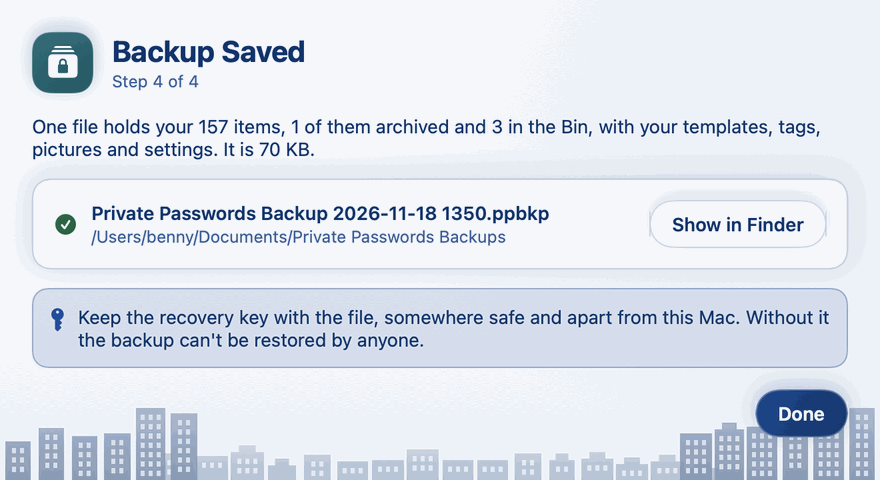
- Backup Saved says what the backup holds, the file's name and folder, and Saved to iCloud. where it went there. Show in Finder shows the file. To keep a second copy of a file, copy it in the Finder.
- Click Done.
Good to know
- Copy puts the key on the clipboard for 2 minutes. Through Universal Clipboard you can paste it on another of your devices nearby, signed in to the same Apple Account.
- New Key makes a fresh key, if you think someone saw the first. The key shown before then opens nothing.
- You can leave the app to save the key in another app: Back Up stays open. On the iPhone, if iOS closes Private Passwords while you're away, that backup is discarded. Start again and save the new key instead.
- The file is saved before the last step shows, so there is nothing left to save at the end.
- An item this version can't read is left out, and the last step says how many.
Checking that a backup works
A rehearsal costs nothing. Open Restore, choose the backup you just made and enter its key. When the next step shows what the backup holds, tap or click Cancel. You've proved the file and the key are good, and nothing has changed.
Restoring a backup
You'll restore a backup on a new device, after reinstalling the app, or to go back to how things were. You need the file and its recovery key, or a backup in your iCloud.
Restoring takes you back to the moment the backup was made. Each item keeps the dates it was made and last changed, when it was last used, the device it was made on and the device that last changed it, as the backup has them. The backup's devices come in too.
Opening Restore
Any of these opens Restore:
- The menu (tap the logo), then Restore; or Restore on the Info page.
- Restore a backup on the welcome screen, the first time you open the app.
- Opening a
.ppbkpfile from the Files app, or tapping one in another app. - Choosing a backup in Import, which says what it is and offers Open Restore.
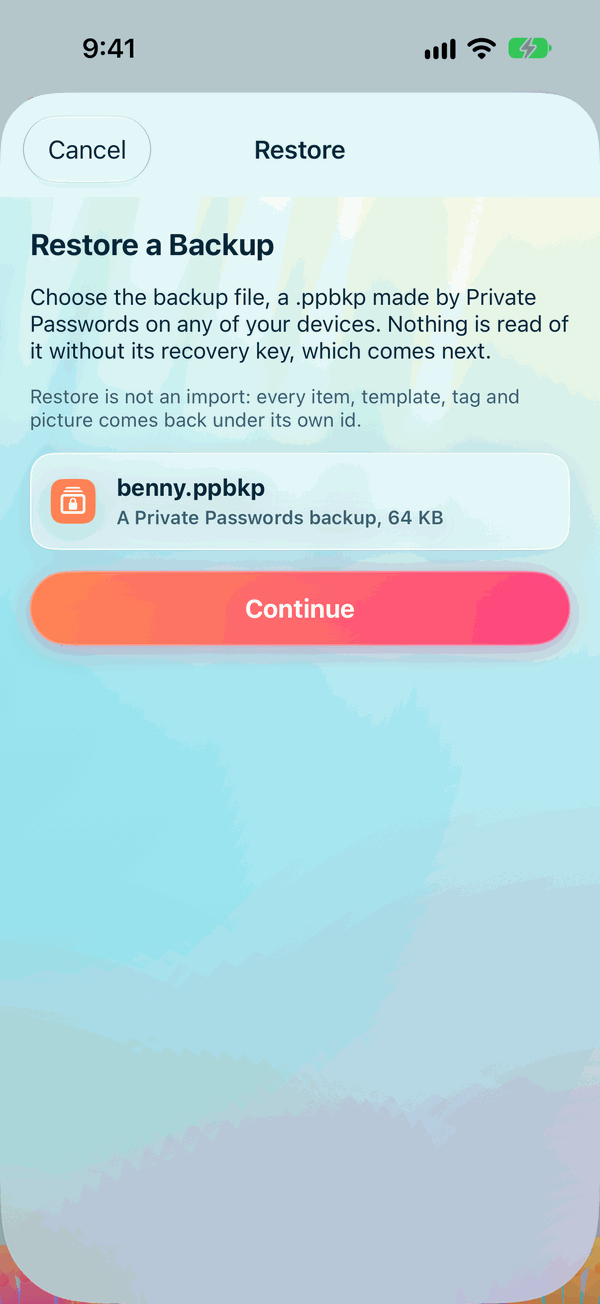
Then tap Choose from Files and pick the backup, unless you opened Restore from the file itself. Files opens in your backup folder, where you have one.
Your backups in iCloud are listed under From iCloud, newest first, each with the day and the device that made it. Tap one to restore it. Swipe left on one and tap Delete to delete it from iCloud, after Face ID or Touch ID: Delete this backup from iCloud? This can't be undone.
Any of these opens Restore:
- The menu (☰), then Restore…; or Restore… on the Info page.
- Restore a backup on the welcome window, the first time you open the app.
- Opening a
.ppbkpfile in the Finder. - Choosing a backup in Import, which says what it is and offers Open Restore.
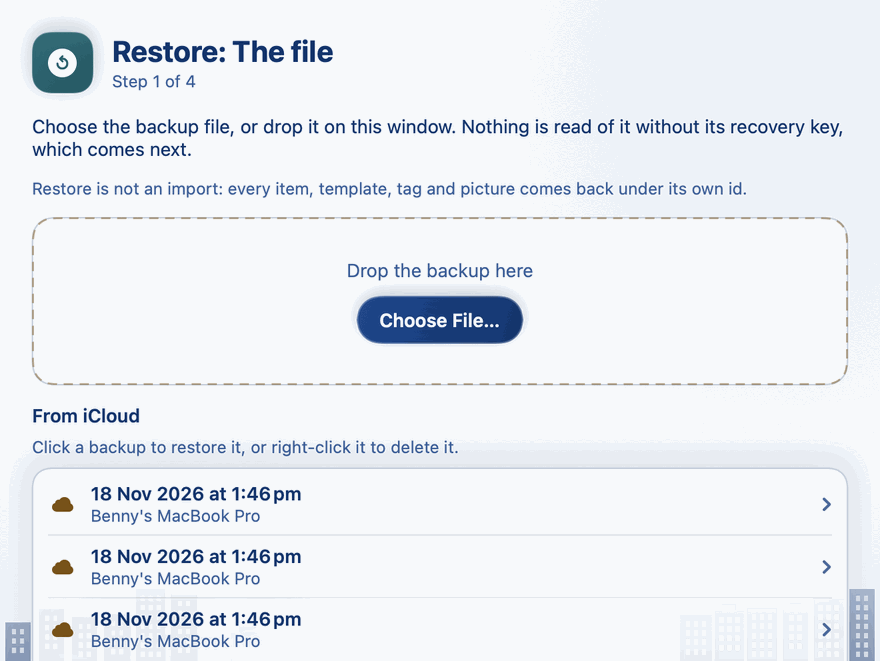
Then click Choose File… and pick the backup, or drop it on the window, unless you opened Restore from the file itself. The file chooser opens in your backup folder. Restore's first page reminds you that it is not an import: every item, template, tag and picture comes back under its own id.
Your backups in iCloud are listed under From iCloud, newest first, each with the day and the Mac or iPhone that made it. Click one to restore it. Right-click one to delete it from iCloud, after Touch ID: Delete this backup from iCloud? This can't be undone.
Step by step
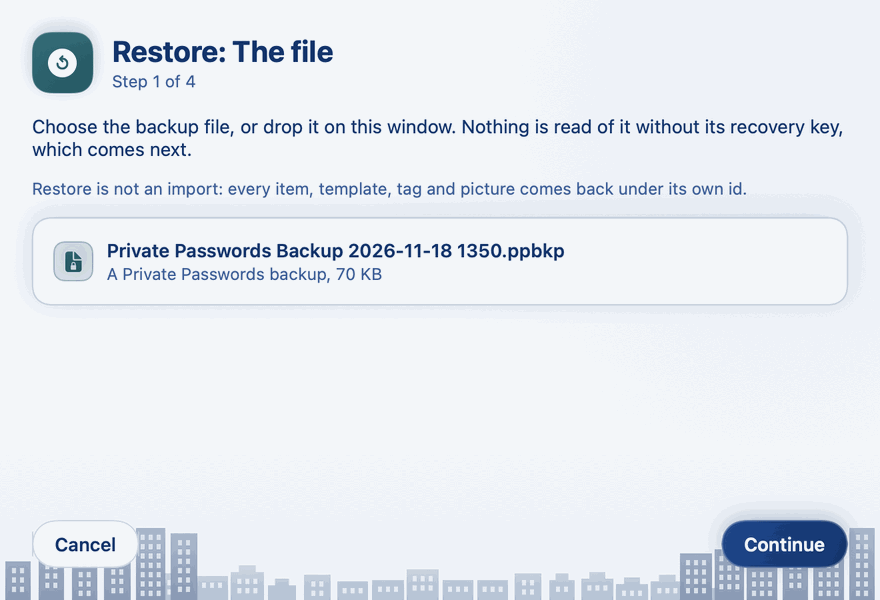
- Restore shows the file's name, and A Private Passwords backup with its size. Nothing is read of it yet. Continue appears once the backup is read, and from then it is that file, Continue or Cancel.
-
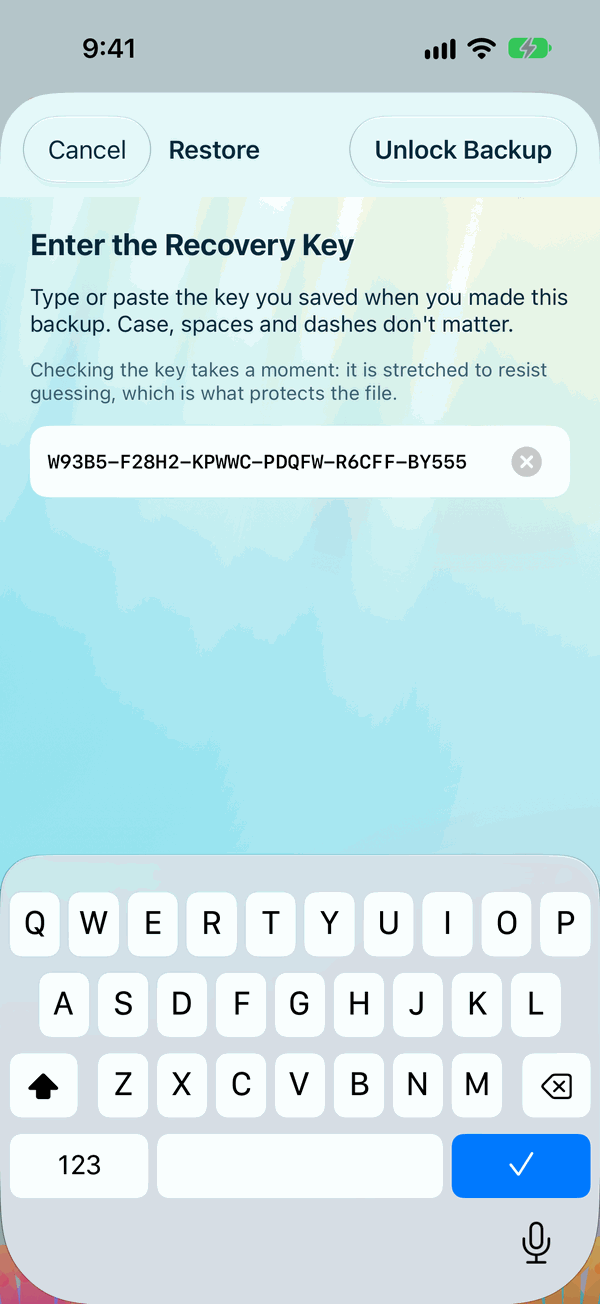
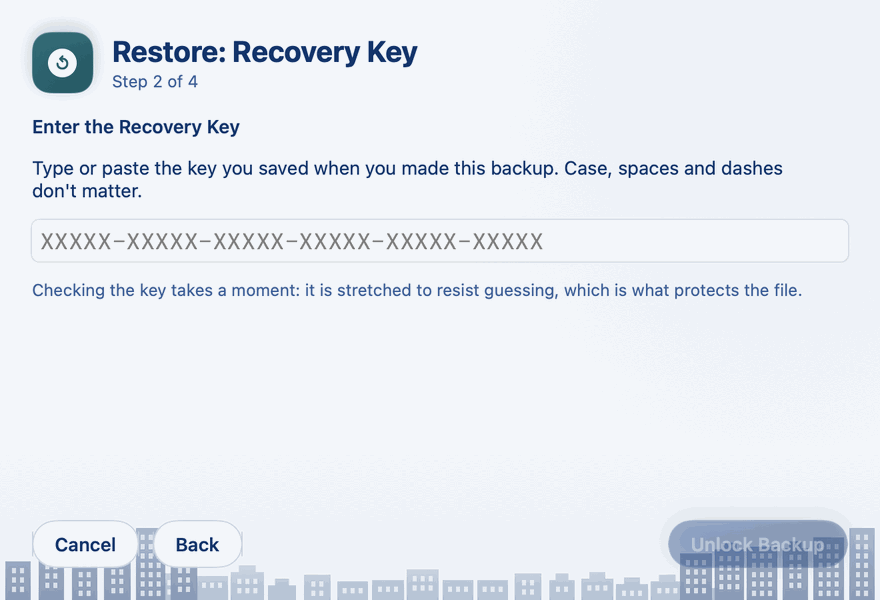
Enter the Recovery Key. Type or paste it. Capital letters, spaces and dashes don't matter. Then Unlock Backup. Checking the key takes a moment: it is stretched to resist guessing, which is what protects the file.
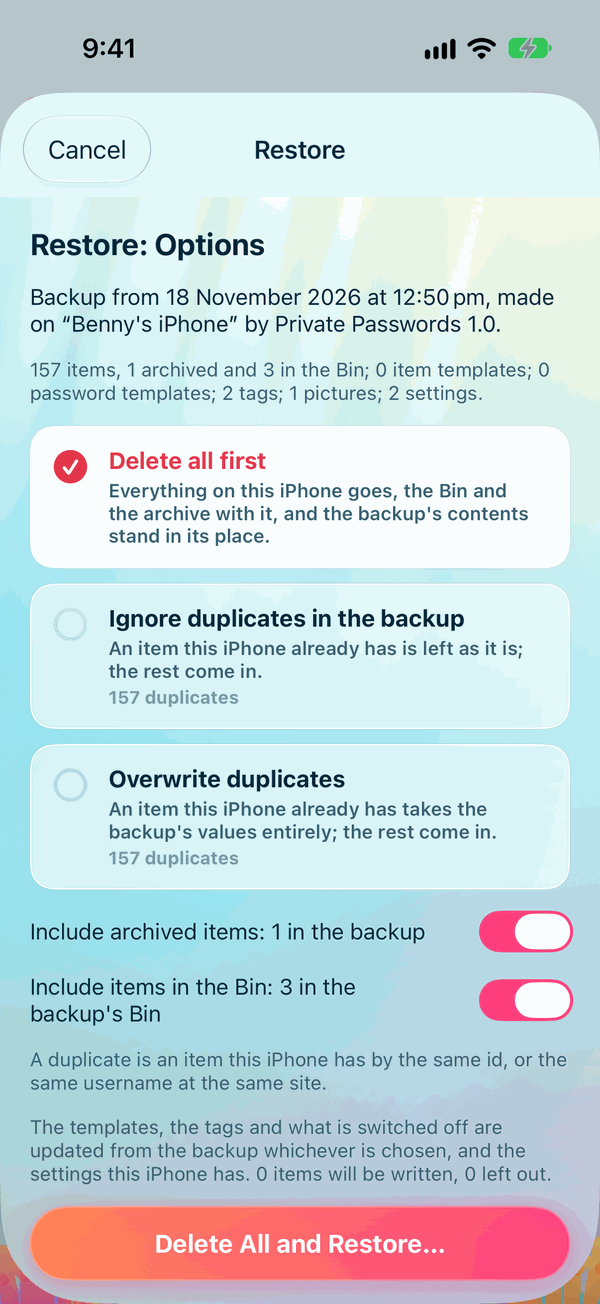
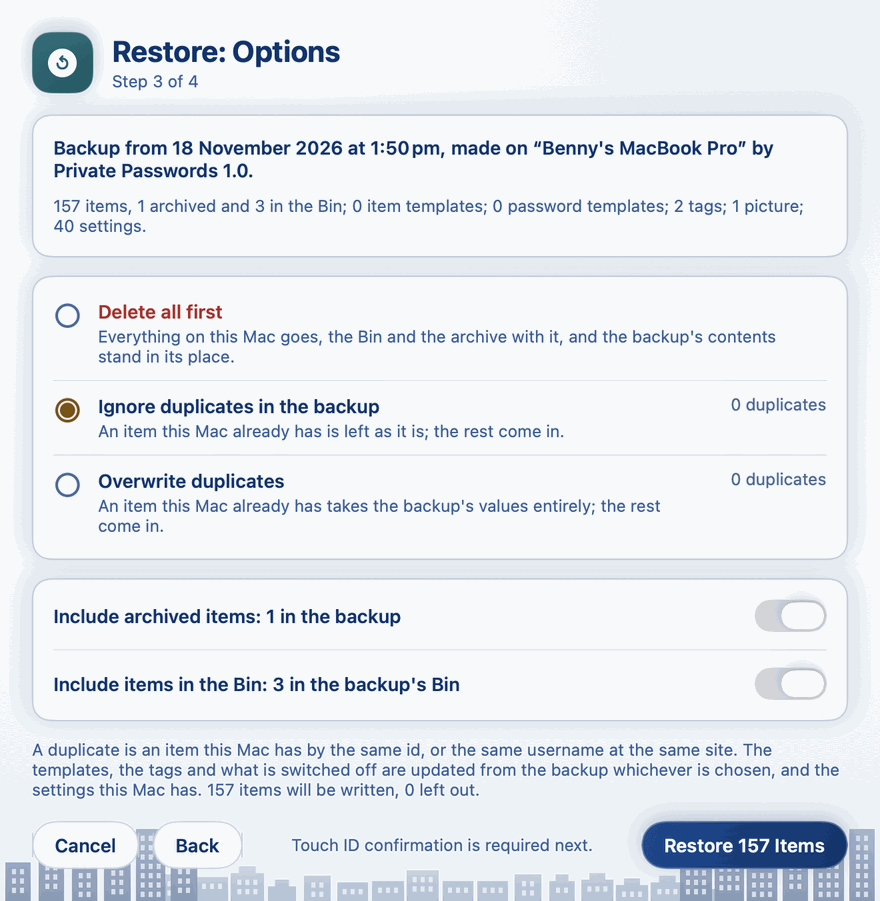
A backup from iCloud goes straight on, with no key to type, where this device holds your iCloud Backup Key. Where it doesn't yet, Restore says so: turn on iCloud Keychain and wait for it to sync, or paste your iCloud Backup Key into iCloud Backup Key and choose Open Backup. Once opened, the key is kept, so this device asks no more. 3. Restore: Options says when and on which device the backup was made, and what it holds. Choose one of the three choices, and leave the two switches on or turn them off. A line at the foot says how many items will be written and how many left out. 4. Choose Restore 412 Items (the number is yours). With Delete all first chosen, the button is Delete All and Restore…, and the app asks once more: Delete everything on this iPhone first? (or this Mac). Choose Delete All and Restore to go ahead. Then confirm it's you, with Face ID or Touch ID on the iPhone, or Touch ID or your Mac's password on the Mac: nothing on the device changes before this. 5. Restoring Backup shows the restore with a bar. Then Backup Restored sums up what happened, with View Restore Report. Done opens Recent, in the order the backup had.
The Restore Report
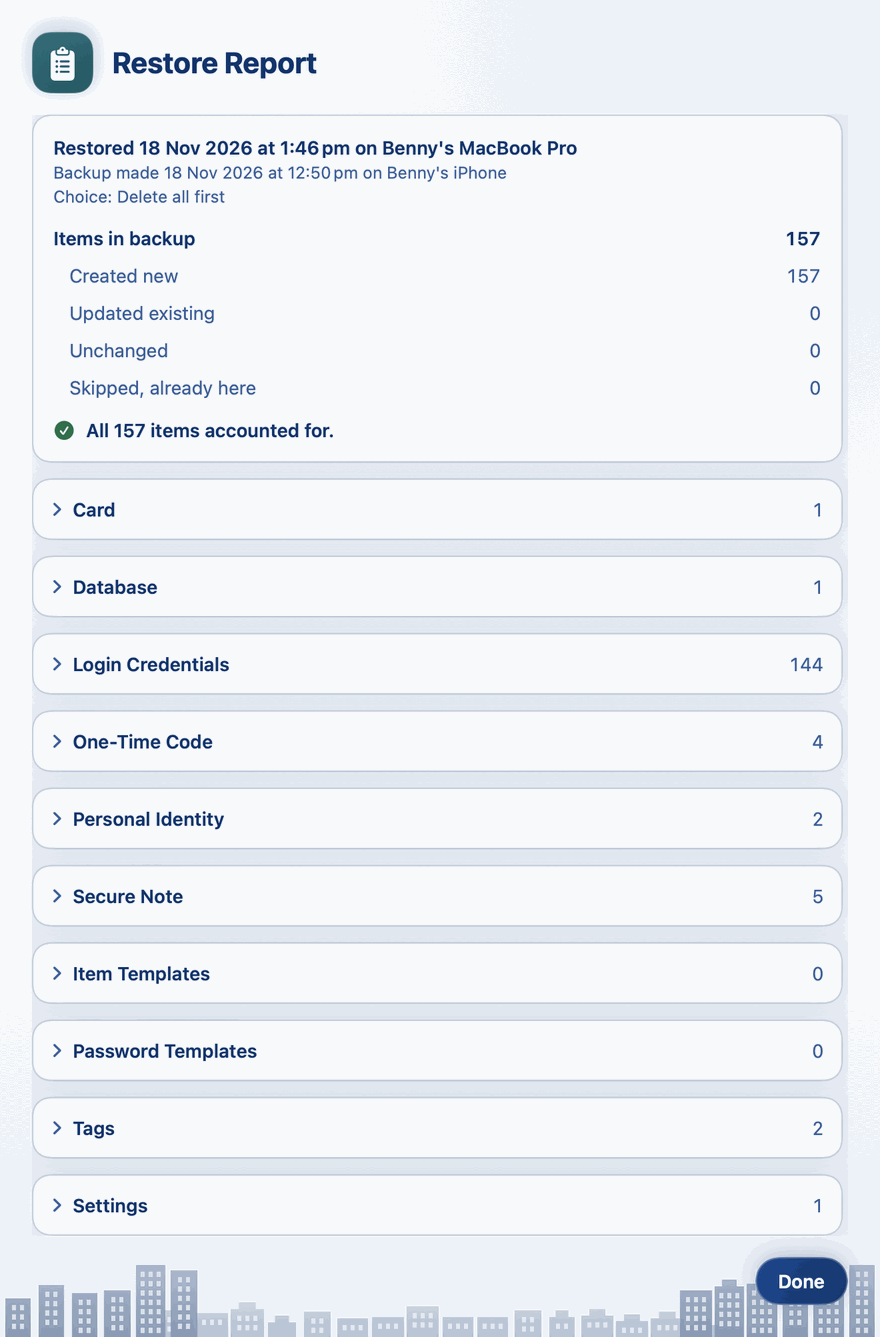
Every restore leaves a report, kept until the next restore. Open it with View Restore Report on Backup Restored, or on the Info page, under Restore, which asks for Face ID or Touch ID first.
It says when and on which device you restored, when and where the backup was made, and the choice you made. Then it counts the items in the backup: created new, updated, unchanged, and skipped because they were here already, with a tick when every item is accounted for. Below, a section for each Type, and for item templates, password templates, tags and settings, opens to list what each holds, by name.
The three choices
| Choice | Items already on this device | Items in the backup |
|---|---|---|
| Delete all first | Every one goes for good, the Bin and the archive with them. This can't be undone. | All come in, in their place |
| Ignore duplicates in the backup (chosen to start) | Left exactly as they are | A duplicate is left out; the rest come in |
| Overwrite duplicates | A duplicate takes the backup's values entirely | All come in |
Two switches choose what else comes in: Include archived items and Include items in the Bin, both on to start. An item in the backup's Bin whose days are already over is always left out.
How a duplicate is judged
The screen puts it in one sentence: A duplicate is an item this iPhone has by the same id, or the same username at the same site. (On the Mac, this Mac.)
- The same id means the very same item: every item keeps its own id for life, through sync and through earlier restores.
- The same username at the same site catches the rest, as an import's possible duplicates do: capital letters and spaces at either end don't count, and an app's login is matched by its app. A name alone never makes a duplicate.
- By the same username at the same site, only items in use count, on both sides: archived items and the Bin's do not. By the same id, an archived item on this device counts too.
A restore is not an import: every item, template, tag and picture comes back under its own id.
What else a restore changes
- Templates, tags, types and what is switched off go back to how the backup has them, whichever choice you make. A template or tag you made since the backup is removed.
- Settings come back, as far as this device has the same settings.
- Restored items follow this device's sync choice. With Sync via iCloud Keychain on, everything a restore writes or deletes reaches your other devices too.
- Undo Last Import is no longer offered after a restore. See Undoing the Last Import.
- A restore is not a backup. The last backup shown beside Back Up on the Info page stays as it was, after Delete all first too.
Messages you might see
| Message | What it means |
|---|---|
| That file is not a Private Passwords backup. | Choose a file ending in .ppbkp. |
| The backup could not be read. It may be incomplete or damaged. | The file was cut short or changed. Try another copy. |
| That backup was made by a newer version of Private Passwords. Update the app, then try again. | Update this device's app first. |
| A recovery key has 30 characters (6 groups of 5). This has 28. | A group is missing or doubled. |
| A recovery key only uses the letters and numbers shown on the key screen. Check what you entered. | A character isn't one the key can contain. |
| That key has a typo: one of its characters is wrong. Check it and try again. | One character is wrong. Check the key against your copy. |
| That key doesn't match this backup. Check it and try again. | The key belongs to a different backup. Find the one that goes with this file. |
| Your iCloud is full, so the backup wasn't saved. Free up space in iCloud, or choose a folder. | Make room in iCloud, or back up to a file instead. |
| iCloud couldn't be reached. Check your connection and try again. | The device is offline, or iCloud is busy. |
| iCloud isn't available on this iPhone. Sign in to iCloud in Settings. (or this Mac, System Settings) | Sign in to iCloud on this device. |
| The backup couldn't be saved to iCloud. Try again. or The backup couldn't be read from iCloud. Try again. | Something went wrong on the way. Try again in a moment. |
Continue to Importing from Another App.